
Friction Folder Knife – DIY project approach..
Step 3: Prepare the Handle Material in Detail: Choosing and Shaping Your Handle Scales
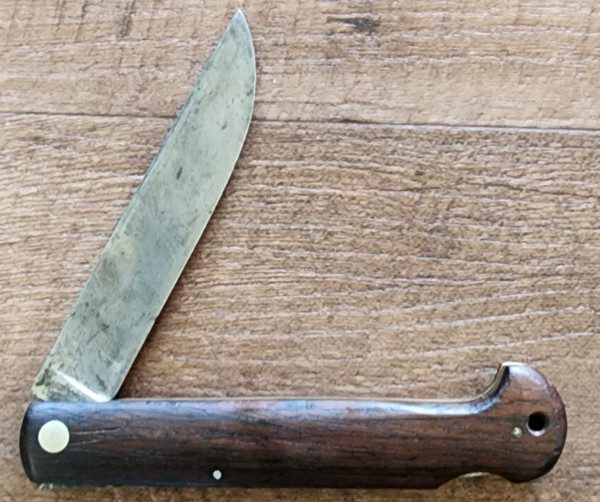
When crafting a friction folder knife, the handle material plays a crucial role in both the aesthetics and functionality of the final product. Here’s a general explanation of how a friction folder handle scales may be prepared and shaped:
1. Select a Handle Material:
- Brass: Known for its durability and corrosion resistance, brass adds a touch of elegance to the handle. It can be polished to a high shine or left to develop a natural patina over time.
- Wood: Wooden handles offer a classic and warm appearance. Choose hardwoods like walnut, oak, or maple for both durability and visual appeal. Exotic woods can also be chosen for a unique and striking look.
- Bone: Natural bone handles provide a traditional and organic feel. Bone can be sourced from various animals and is often treated for stability and durability.
- G-10: A high-pressure fiberglass laminate, G-10 is lightweight, durable, and available in various colors. It provides excellent grip and is resistant to moisture and chemicals.
- Micarta: Made from layers of linen, canvas, or paper impregnated with epoxy resin, Micarta is a robust and versatile material. It offers a comfortable grip and comes in a variety of colors and patterns.
2. Cutting the Handle Scales:
- Using the traced outline of your blade as a template, transfer the design onto the chosen handle material.
- Secure the material in a vise or with clamps to ensure stability during cutting.
- Use a hacksaw, band saw, or scroll saw to cut out two identical pieces for the handle scales. Take your time to achieve precision, as symmetrical handle scales contribute to a balanced and visually appealing knife.
- Verify handle size fits in various hand sizes comfortably and safely.
3. Shaping the Handle Scales:
- Once you have the basic shape, use files to refine the contours of the handle.
- Start with a coarse file to remove excess material and gradually switch to finer files for more detailed work.
- Pay attention to ergonomics, ensuring that the handle feels comfortable in hand.
- Consider factors such as finger grooves and a slight curvature for a natural grip.
- Round off edges and corners to prevent discomfort during use.
- Take breaks to test the handle’s comfort and make adjustments as needed.
- Test twice, Grind a little at a time: It’s easier to remove more material, than replace material that was unintentionally removed through a lack of awareness.. =].
- 4. Adding Texture or Patterns
- Depending on your chosen material, you may want to add texture for enhanced grip.
- Use a file or sandpaper to create grooves or patterns on the handle.
- For G-10 or Micarta, you can shape and texture the material by sanding or grinding.
- Experiment with different techniques to achieve the desired result.
5. Fine-Tuning and Polishing:
- Once the shaping is complete, progress through various grits of sandpaper to achieve a smooth finish. This step is crucial for comfort and aesthetics.
- Consider polishing brass or smoothing out wood to enhance the handle’s visual appeal.
6. Testing Comfort and Functionality:
- Before finalizing the handle, hold the knife in your hand to ensure comfort and usability.
- Make any necessary adjustments to address sharp edges that can injure the end user, as well as uncomfortable angles, or other potential ergonomic issues.
By putting thoughtful consideration into the selection and preparation of your handle material, you contribute significantly to the overall character and functionality of your handmade friction folder knife. Experiment with different materials and designs to create a handle that not only complements the blade but also reflects your personal style and preferences.

By using this site you're accepting
our Online Sales Disclaimer
*Must Be 18 years or older to purchase*